| CPU | Intel Pentium 4 520 w/HT (2.8GHz) |
| LCD | 17" WXGA+ BrightView WideView (1440x900 max) |
| RAM | 1GB |
| HD | 60 GB |
| CD/DVD | DVD/CD-RW Combo Drive |
| VIDEO | 256MB ATI Mobility Radeon X600 |
| SOUND | Intel AC97 based integrated sound |
| Modem/Network | Integrated 56K Modem+10/100 Ethernet LAN |
| Battery | 12 Cell Lithuim Ion Battery |
The following contributions and comments have been added only after receiving permission to post comments / names. If I receive an e-mail from you, I will not post it here unless you give me permission to do so.
| Name of Contributor | Contribution/Comment |
| J. Ritter - 2005Mar08 14:01 |
I've seen your page about debian on a hp pavilion zd8000. I found it very usefull! Personaly, I had troubble starting both netinstall dist and standard distibutions of debian on this computer. I've found a solution with disabling the framebuffer in the woody 3.0r4. Here's the line I'd used to start the install on standard distribution "bf24 video=vga16:off". Regards, J. Ritter |
| EinarJ - 2005Feb25 13:29 |
1. USB crashes can be avoided inserting an USB section in XF86Config-4. 2. It's not necessary to reinstall Windows XP. I defragged using a defragger in Windows XP, then downloaded Systemrescue from Debian, burnt it to a CD, booted into Systemrescue and used the ntfs tools to reduce the size of the Windows XP ntfs file system. Then I went into cfdisk and deleted the Windows XP ntfs partition, made a new ntfs partition the size I wanted (17GB Important: MUST BE THE SAME SIZE AS THE REDUCED WINDOWS XP NTFS FILE SYSTEM) and added partitions for /boot, swap and / (100MB), (600MB) and the rest of the harddisk. 3. I used Debian netinstall with the same problems as you had. Check out Frans mail below. I ran Systemrescue again, ran mkdir /mnt/mydir and mounted /dev/hda. Then I used nano to blacklist i810_audio in /etc/hotplug/blacklist and /etc/discover.conf. Voila - everytning worked when restarting. 4. I've got the wireless to work today, required some work. 5. I've got the display to work at 1440x900, but not at full speed. Looking forward to check out your page and see if I can get full speed. |
For Step 1, you have two options, (1) Resize your WinXP NTFS partition using Knoppix and ntfsresize or (2) Blow away WinXP and reinstall fresh with the correct partition size... Your choice... options below.
To resize NTFS you will need to download and burn a copy of Knoppix (Linux Live-CD) and run QTParted. Knoppix Link
To quote the ntfsresize FAQ... below are the directions from that page:I currently have a 60GB drive and I want to have a 30GB for Linux / 30GB for WinXP. Reinstall WinXP deleting the original partition. And then press 'C' to create a new windows partition. If you just press enter you'll be using the ENTIRE hard drive for WinXP. (Made that mistake by accident.)
After you finish reinstalling WinXP, use the HP Application and Recovery DVD to recover all the applications and settings that your HP came with if you'd like. NOTE: I used this DVD after switching from WinXP Home Edition (came with computer) to Pro Edition and it worked fine. So don't worry about that if your upgrading to WinXP Pro.
I was going to recommend downloading the netinst of 'Sarge' using the new Debian-Installer, but unfortunately when I tried to install using the sarge-i386-netinst.iso dated 2005Feb23 (~RC2), I couldn't get Debian to work. I was getting an error related to hotplug trying to load the sound drivers and fatally failing. I've concluded that the problem was that the sound drivers for this laptop where probably not included in this build. I'm sure this will work in the future, but until then I recommend using the 'Stable' release (3.0) just to get the system up and running and then upgrade to a new kernel later. Later in this document I post the .config file which I used to build the 2.6.10 kernel which is working with my laptop.
NOTE: In this section I mention how you can make a Debian package for easy installation of the kernel. If you want to skip this step, feel free to e-mail me requesting the 2.6.10 kernel debian package I built. I'll try to get it to you as quickly as possible.
Since my system has 1GB of RAM I decided to make a 2GB partition for SWAP space. I heard that roughly double your RAM amount is a good choice. I then used the remaining free space for / using EXT3 file system.
The Debian installer seemed to setup the network card just fine, but when I upgraded to 2.6.10 kernel, it didn't automatically load the network driver. The driver 8139too seems to work fine. Either add that to your /etc/modules or type:
modprobe 8139too
If you want to build your own kernel, install the Debian package kernel-source-2.6.10 or which ever kernel you want to use, but this one worked for me. Next you need to decompress the kernel. Copy this .config file into the top level of the newly extracted directory (/usr/src/kernel-source-2.6.10). In that directory type
make oldconfig
To make this into a debian package so you can easily install it, install kernel-package (apt-get install kernel-package). Then type:
make-kpkg kernel_imageIf you get any errors, you probably have dependancy problems. Go to the Debian Packages page and go to 'Search the contents of packages' and select the distribution you are interested in... in my case 'Testing'. Then search for the missing file (i.e. someheaderfile.h) and it will tell you which package you need to install.
Once the make-kpkg finishes, you'll find the debian package in /usr/src/. Type the following to install your new kernel:
dpkg --install kernel-image-2.6.10_10.00.Custom_i386.debOnce that's done you'll need to update your boot loader. In my case, grub. Typing the following will update grub:
update-grub
I changed my apt preferences (/etc/apt/preferences) to the following so that I can get the 'Sarge' distribution and XFree86 4.3. Basically, it changes the priority so apt will look for packages first in testing, then unstable, then stable. Set this up how every you would like.
    Package: *
    Pin: release a=testing
    Pin-Priority: 950

    Package: *
    Pin: release a=unstable
    Pin-Priority: 900

    Package: *
    Pin : release a=stable
    Pin-Priority: 850
apt-get install x-window-system
I personally like to use gnome (Debian Package: genome-desktop-environment) with gdm (Debian Package: gdm). Note that if you install gdm it will automatically launch X, which won't work yet. So you may want to install this package later. If you do install it, you can turn it off by going to a console by pressing alt-F1, login as root and type:
/etc/init.d/gdm stopWhen you are ready to turn it back on again type: /etc/init.d/gdm start When you reboot your laptop gdm will automatically start in the future. If you happen to be new to linux, you might want to try out KDE as well as GNOME to see which one you like better. (Debian Package: kde) GDM will let you choose from a menu which one you wan to use.
Download the rpm package from the ATI Driver page (NOTE: This link breaks every so often) (Choose the download for your version of X Windows).
If you are having trouble finding the driver, follow these instructions.
    (1) Goto http://www.ati.com.
    (2) Click on 'Drivers & Software'
    (3) Click on 'Linux Display Drivers and Software'
    (4) Click on 'RADEON 8500 Series and higher' for Linux
        x86 (most likely this one for zd8000) or x86_64.
    (5) Click on 'ATI Proprietary Linux x86 Display Drivers
        for XFREE86 / X. Org Version 8.20.8'.
    (6) Choose the download that matches your version of X
        Windows.
I converted this package to a Debian package using alien (apt-get install alien) by typing:
alien -d --scripts file_name.rpmNormally you can get away with typing:
dpkg --install file_name.debBUT, in this case, we need to use the --force-overwrite option, so that it can overwrite /usr/X11R6/lib/libGL.so.1.2 which was provided by xlibmesa-gl package).
Next you have to build the kernel modules for your system. If you installed a Debian built kernel like kernel-image-2.6.10-1-686, you also need to install the headers package for that kernel. In my case 'kernel-headers-2.6.10-1-686'.
apt-get install kernel-headers-2.6.10-1-686Then you need to get ready to build the modules:
cd /lib/modules/fglrx/build_modType:
bash make.shIf it builds properly, go back a directory to /lib/modules/fglrx/ and type:
bash make_install.sh
fglrxconfig
2) PS/2 or USB with PS/2 protocolMouse Model:
2) PS/2 Wheel Mouse (X11 Generic)Emulate 3 Buttons:
yesMouse Device:
/dev/psaux
3) Generic 104-key PC
No
No
Option "MonitorLayout" "AUTO, AUTO"to:
Option "MonitorLayout" "LVDS, CRT"
I just changed this after I had choosen auto detect, so I don't know which one is the right one to choose from the menu. If you select one, please confirm it put the correct line in XF86Config-4.
If you get an error like the following in your /var/log/XFree86.0.log, then the above change may be your solution.
    (II) fglrx(0): Not using default mode "640x480" (hsync out of range)
    (II) fglrx(0): Not using default mode "1280x1024" (hsync out of range)
    (II) fglrx(0): Not using default mode "640x512" (hsync out of range)
    (II) fglrx(0): Not using default mode "1600x1200" (height too large for virtual size)
    (II) fglrx(0): Not using default mode "1600x1200" (height too large for virtual size)
    (II) fglrx(0): Not using default mode "800x600" (hsync out of range)
    (II) fglrx(0): Not using default mode "1600x1200" (height too large for virtual size)
    (II) fglrx(0): Not using default mode "800x600" (hsync out of range)
    (II) fglrx(0): Not using default mode "1600x1200" (height too large for
I couldn't find the specs on HPs website. So I e-mailed them and they gave me the following ranges. (FYI, I have the WXGA+ 1440x900 LCD.)
Horizontal Range: 8) Manual Entry: 31.5-48.51) Change the modes for 24-bit (24-bit color)Choose:
7) 1400x1050This last option will need to be changed manually later to 1440x900.
1) no restrictions
Confirm that the line has been changed from:
Option "MonitorLayout" "AUTO, AUTO"to:
Option "MonitorLayout" "LVDS, CRT"Note that I've changed the mouse settings in my XF86Config-4 so that it supports both the built-in synaptics touchpad and an external USB mouse with mouse wheel.
Type
startxto see if things work. If not you can press ctr+alt+backspace to get out of X. Hopefully it will just work at this point.
At this point, you should be up and running. I recommend using gdm for a graphical login if you haven't installed it yet. Enjoy!
I finally got the audio working. I followed the instructions on the ALSA web site The instructions mostly worked, except I had to change one line from:
alias snd-card-0 snd-to:
alias snd-card-0 snd-intel8x0If you want to skip the instructions on that website, you can use my modules.conf file which has all the sound stuff setup properly for the zd8000. Note that I built the ALSA & OSS modules into my kernel. If you didn't do that you'll have to install the ALSA modules based on the intructions on the website.
After I restarted Linux so all the modules would load, I typed the following commands as root to give all programs premission to use the sound card:
    chmod a+rw /dev/dsp
    chmod a+rw /dev/mixer
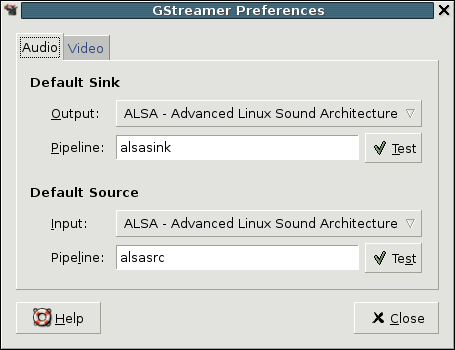
I ran into a little problem where xmms could play an mp3 file, but the gnome-volume-control couldn't open /dev/mixer. The solution to this problem was to install gstreamer0.8-alsa:
apt-get install gstreamer0.8-alsaAnd then open Applications > Desktop Preference > Advanced > Multimedia Systems Selector (gstreamer-preferences from commandline) and change output and input to ALSA as shown below.
Note: You may need to logout and logback in before your sound will work properly.
Next I binded the three audio control keys on the keyboard
to control the sound. I did this using Applications >
Desktop Preferences > Keyboard Shortcuts. Just scroll
down until you get to the audio section as shown below:
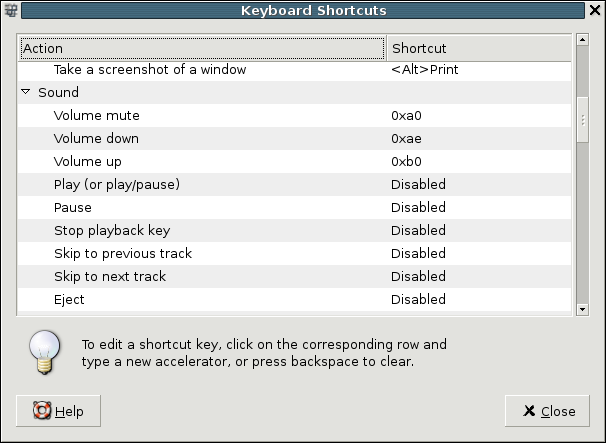
Just click on each one and then when it asks for which
key to press, just press the audio keys above the keyboard
and your set. =o)